My Hexagon Wedding Cake

I always knew I wanted to make my own wedding cake, so when the time came I was all for it – even if others took some persuading. Thankfully I had encountered plenty of people who have done this for themselves. I was fairly optimistic that I had learnt from their sometimes very stressful experiences, and picked up some good methods making a few wedding cakes over the years. So with a few helpers, and a plan (which was very flexible) I did it!

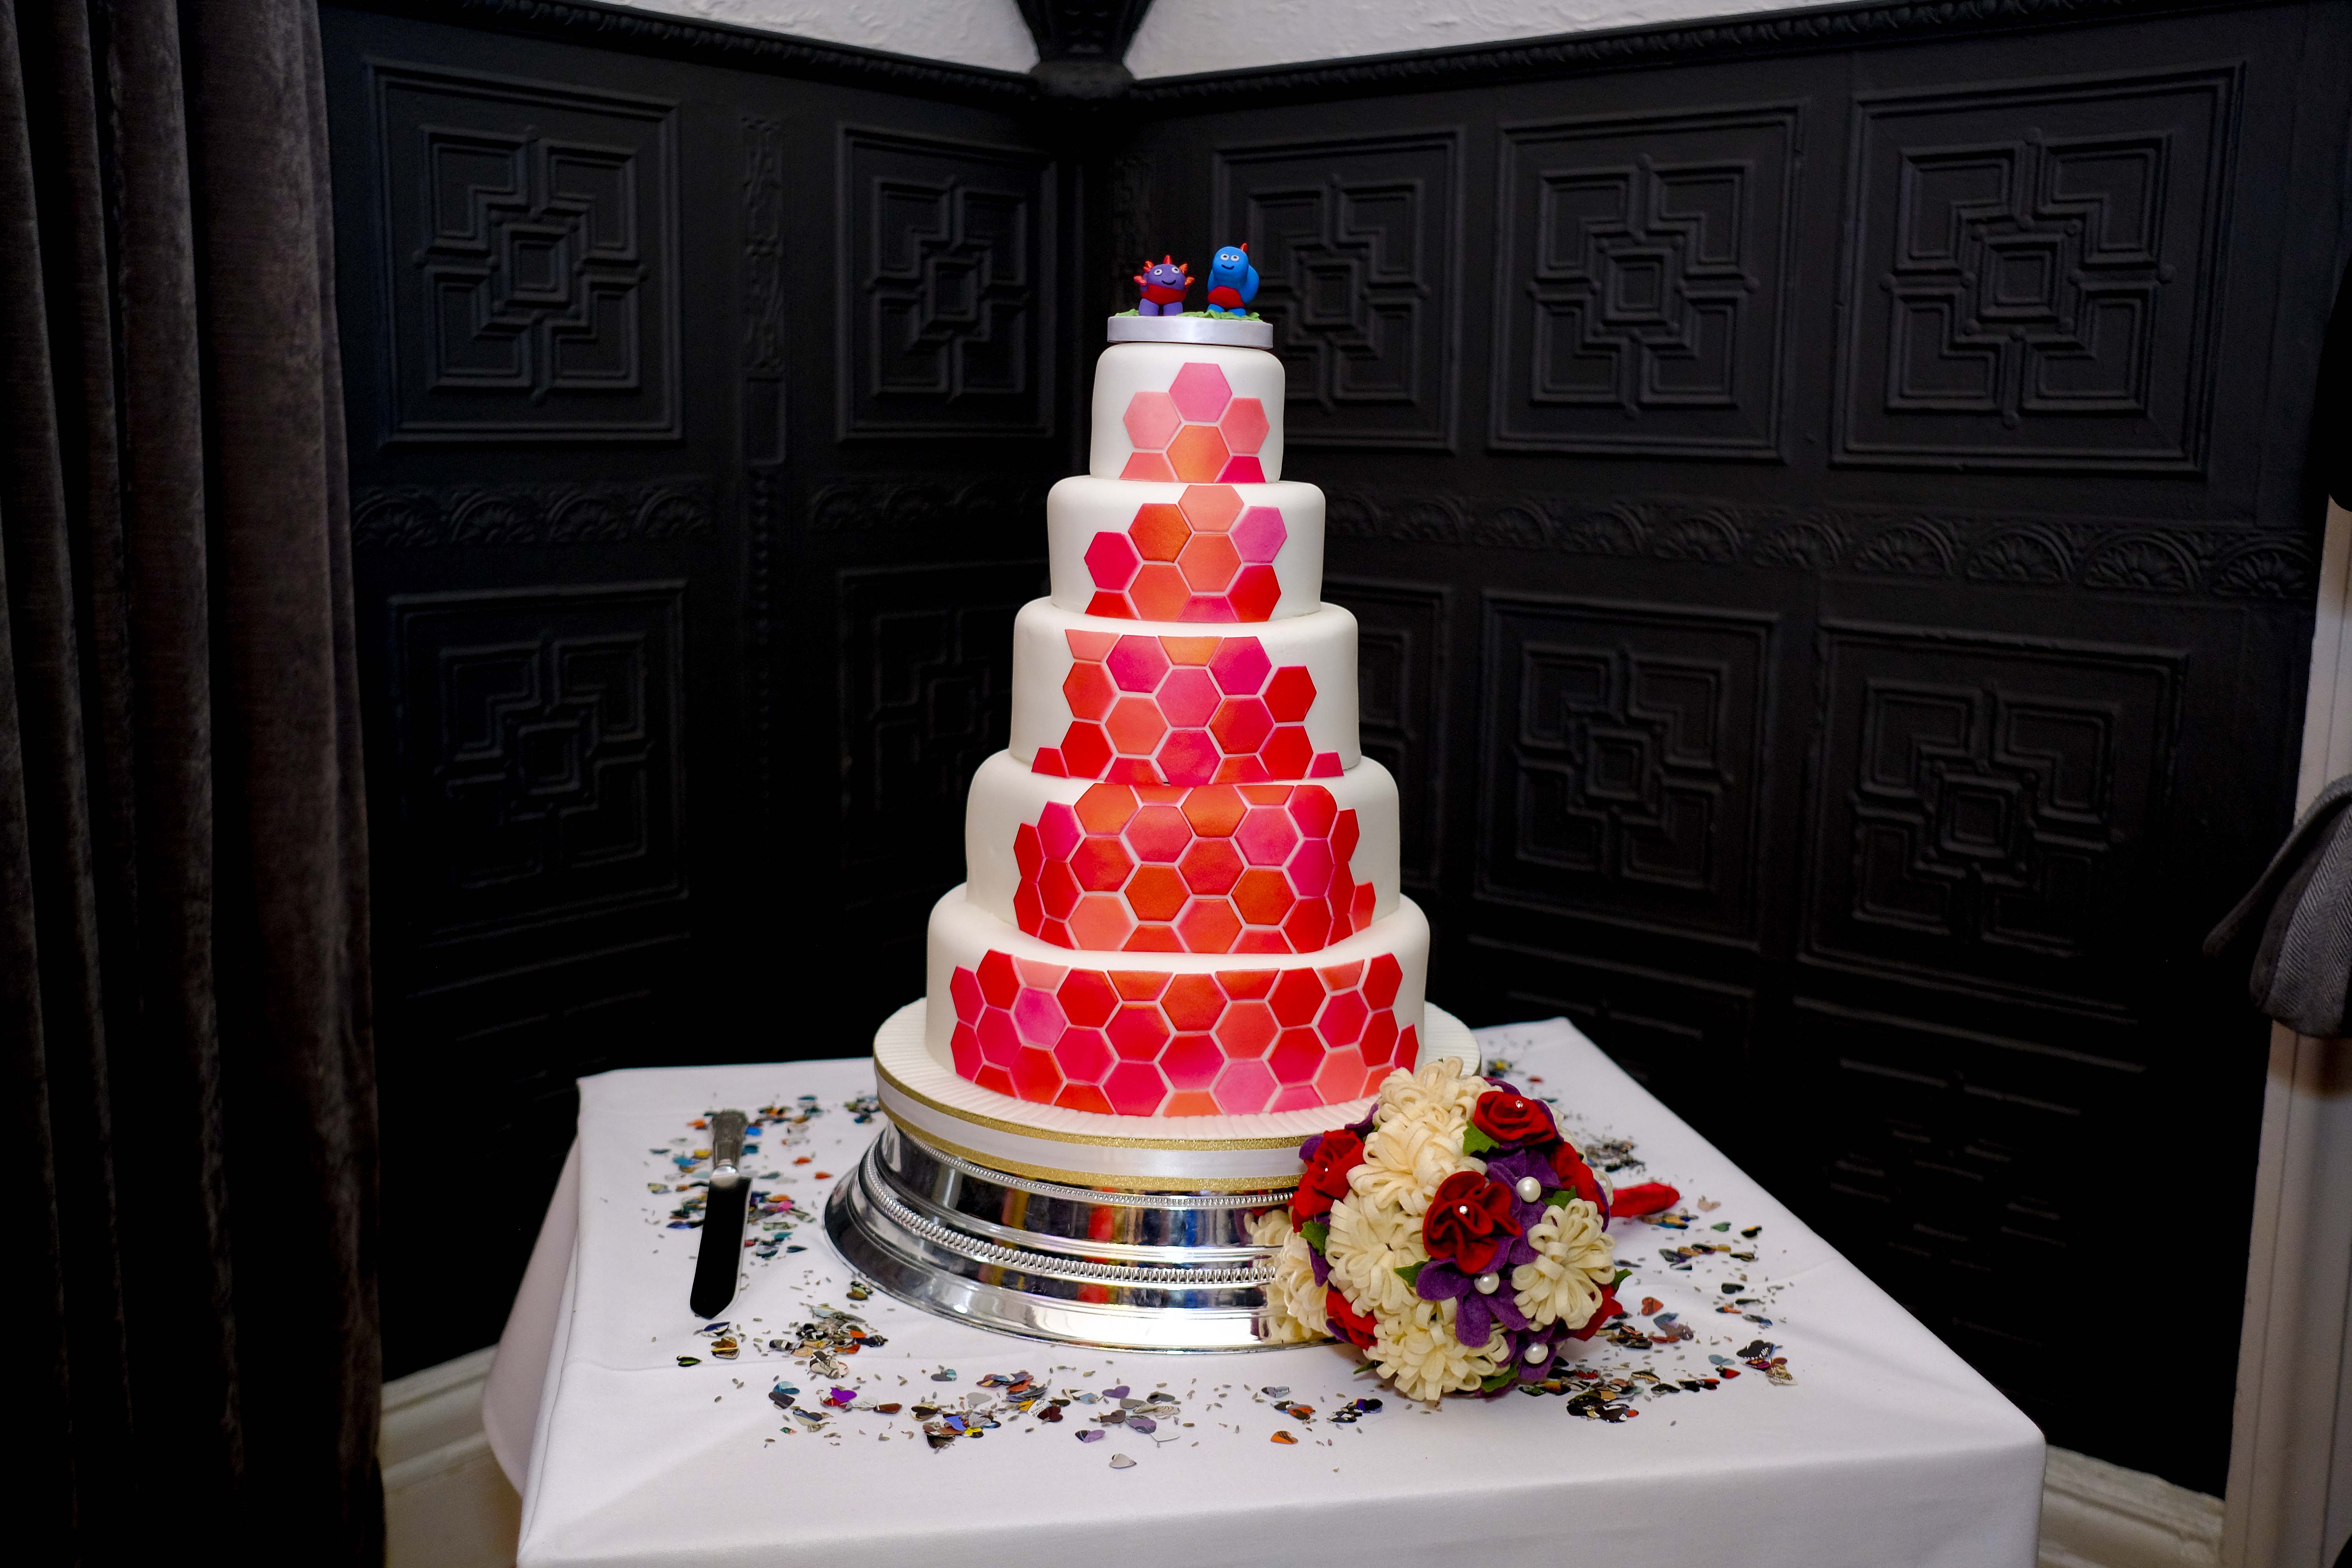
It turns out that when you spend a lot of time looking at cakes, the phrase ‘spoilt for choice’ does not even come close to the issue off choosing a design. Then you consider that the groom also had his input on flavours and designs. And then the helpers too – if someone if helping with such a large potentially stressful task they get some input too. Nothing was quite right, until geometric cakes with hexagons appeared on Pintrest. Thankfully the Sugarcraft guild ran an airbrushing class with Dinky Doodle and that helped to solidify the plans – it more confidence in air brushing and let me see the colours in real life too. So colours and hexagon cutters were ordered and all the bits like boards and dowels (always straws for me). Due to the family love of Hearts and the colours of the tartan, shades of red were chosen.

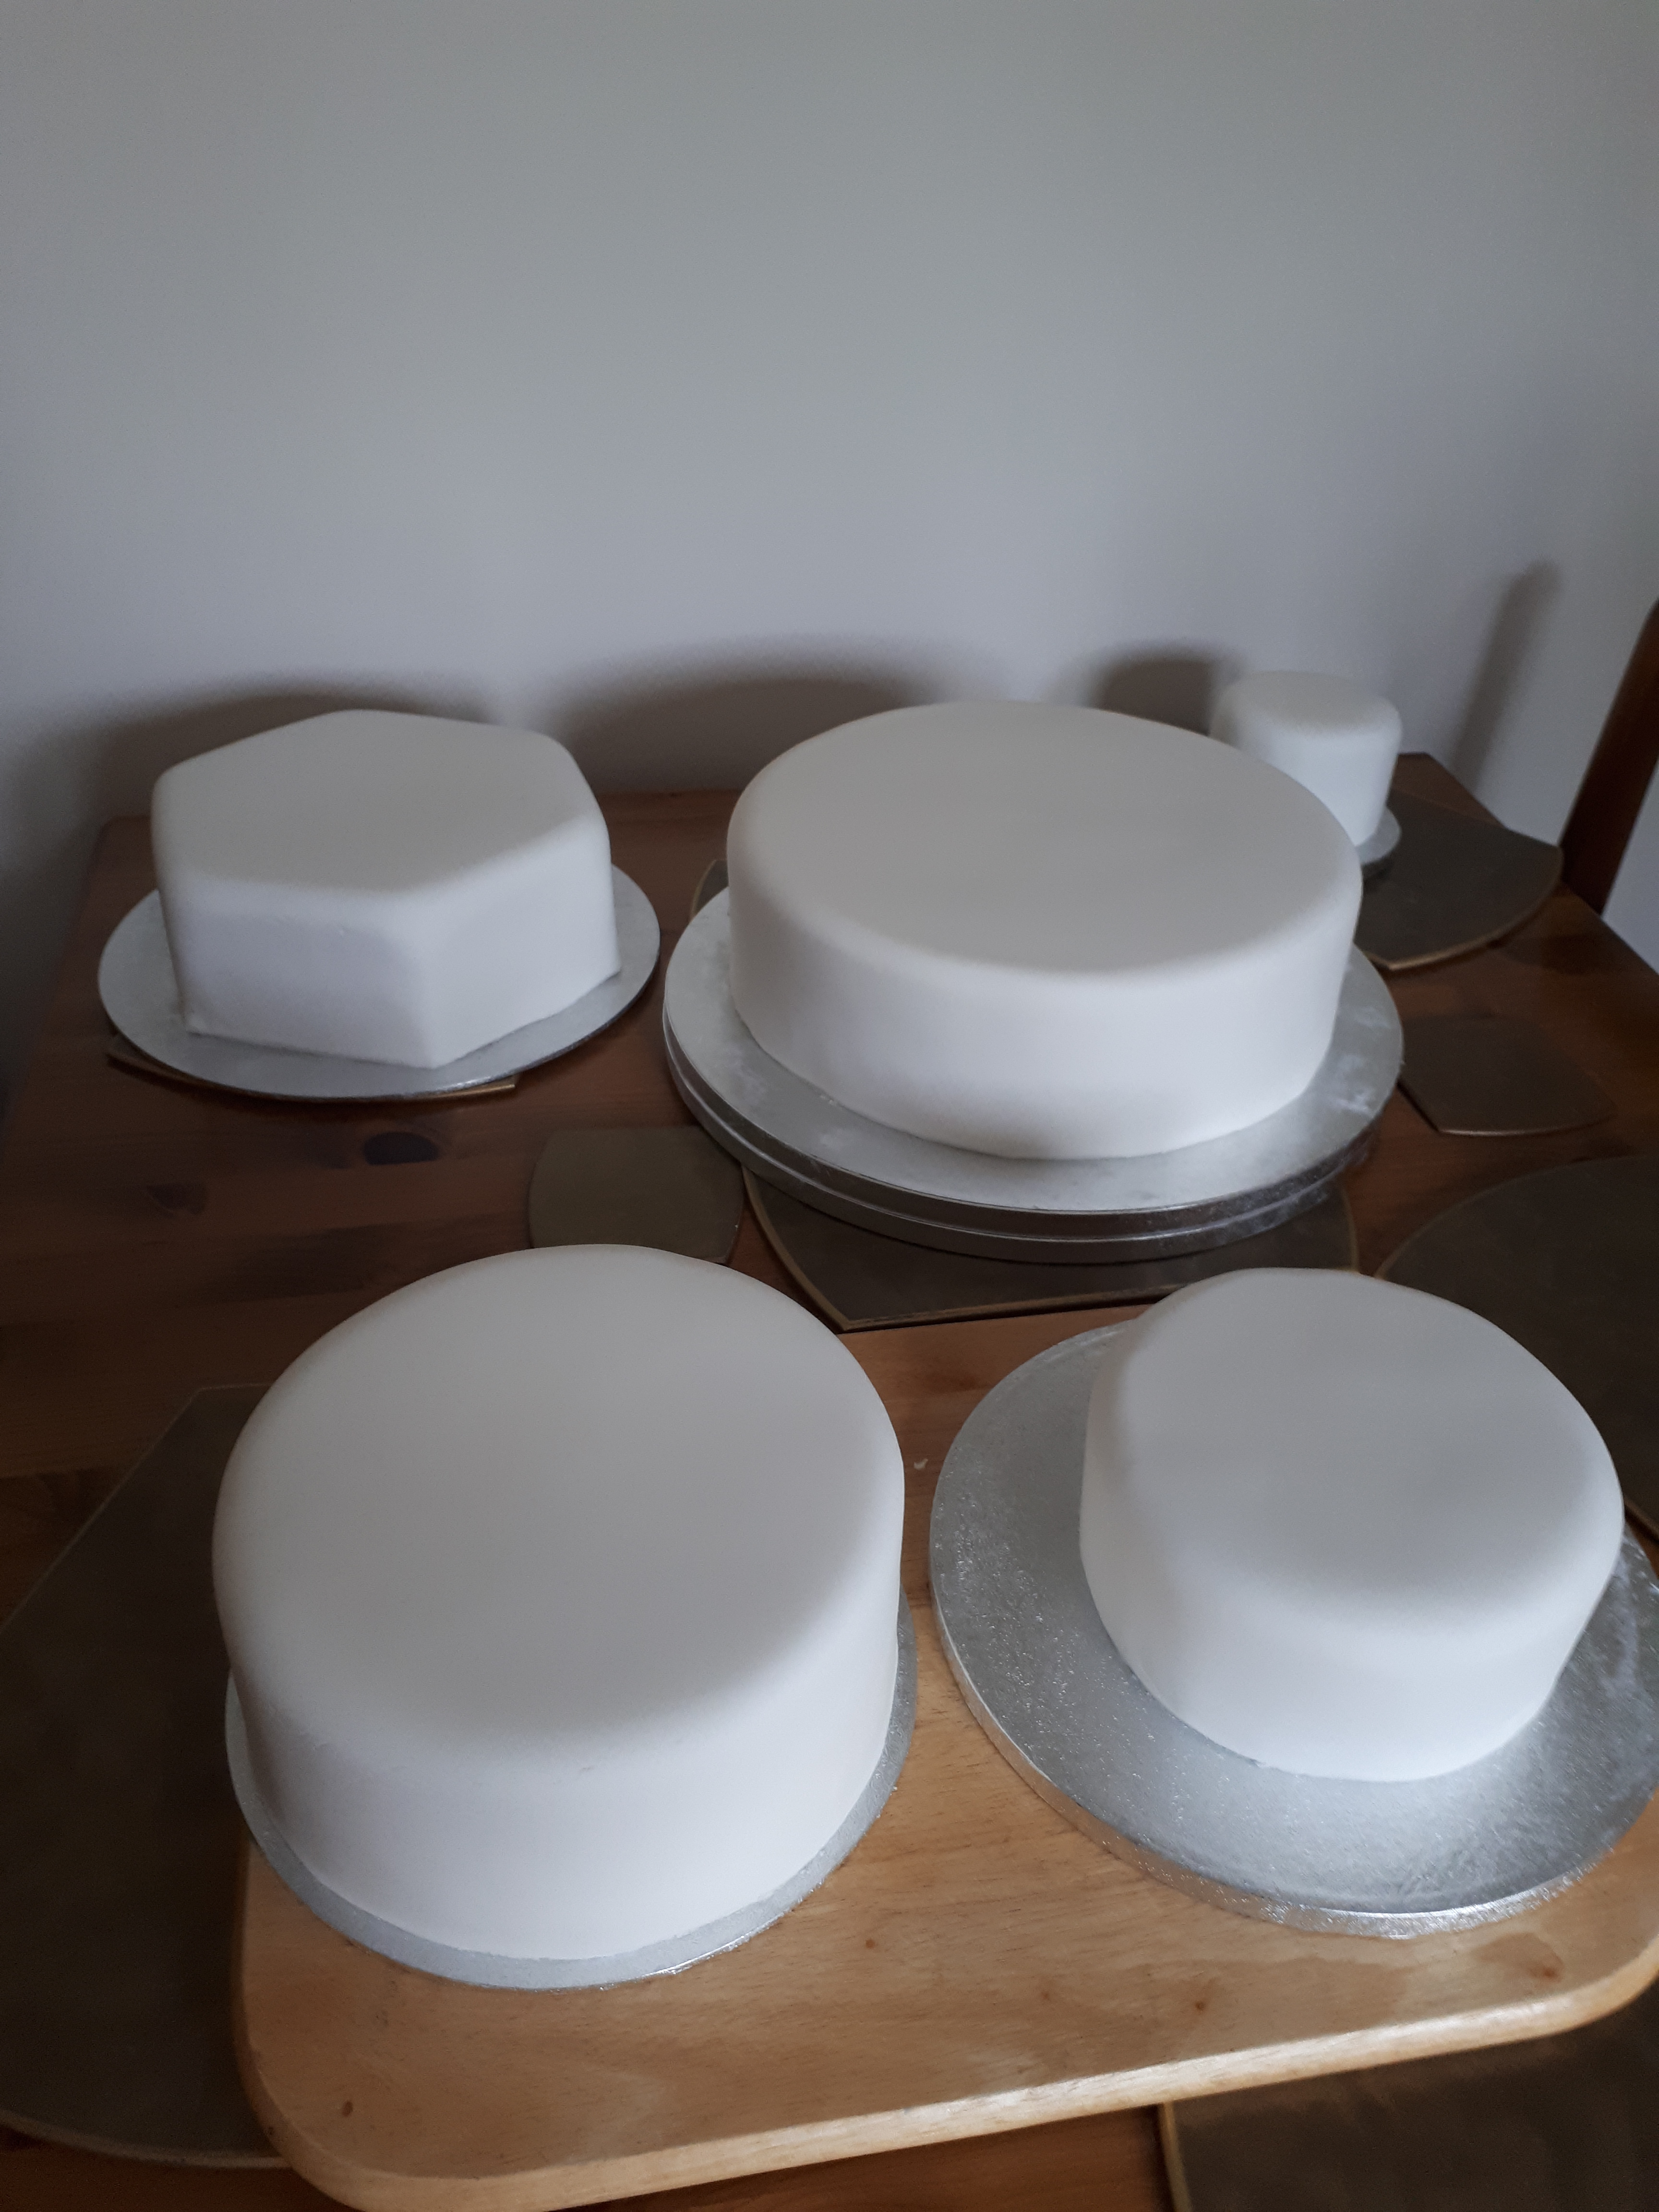
One of the best discussions was how many tiers the cake would have. We were both happy to stick with 3 tiers, a standard wedding size and enough for our guests. Turns out my key helper, my mum, was keen to go slightly bigger than usual and I did not need much encouragement, so 5 tiers was agreed. Mostly round with one hexagon shaped tier for a bit of interest. Thankfully Paper Lace helped with the sizing of that and there was much stacking of tins and boards to get the right look – always check in what direction your hexagontins/ boards are measured in!

There was a lot of debate on flavours, but really, you can’t go wrong with the classics – chocolate, Victoria sponge and lemon. The two smaller tiers we made life easier for ourselves – rocky road and toffee crispy cake. That also meant they could be made quickly and set quickly, so less oven time. There was also another sponge for our free-from guests. With family and friends with various allergies/ intolerances, there was no chance I would have a cake without some consideration of this.

Mum was in charge of baking, I was icer and decorator. Deciding on the cake topper took a bit more time too – we didn’t want people, so as it was at Edinburgh Zoo we had looked at jungle themed decorations, then dinosaurs popped up, which we loved. So dinosaur toppers it was! They were made a little in advance of everything else. The smallest hexagon cutters made an indentation on the board, and a few leaves to decorate it a little. Some of the air brush colour was painted on for the dinosaur details.

It took a fair bit of time to get everything baked, buttercreamed and covered in sugar paste – but keeping things simple with just using one colour of sugar paste helped.

The next step was hexagons. Lots of hexagons. A brief experiment showed that air brushing and then cutting was going to work better than cutting then airbrushing – the shapes were prone to moving under the air brush, and cutting afterwards left nice clean edges. I mostly went with using the colours as they mixed in the airbrush – started lighter, worked up to darker, with a bit of shimmer. So they stayed softer they were covered in Clingfilm to stop quite so much air getting to them – this gave me longer to work with them.

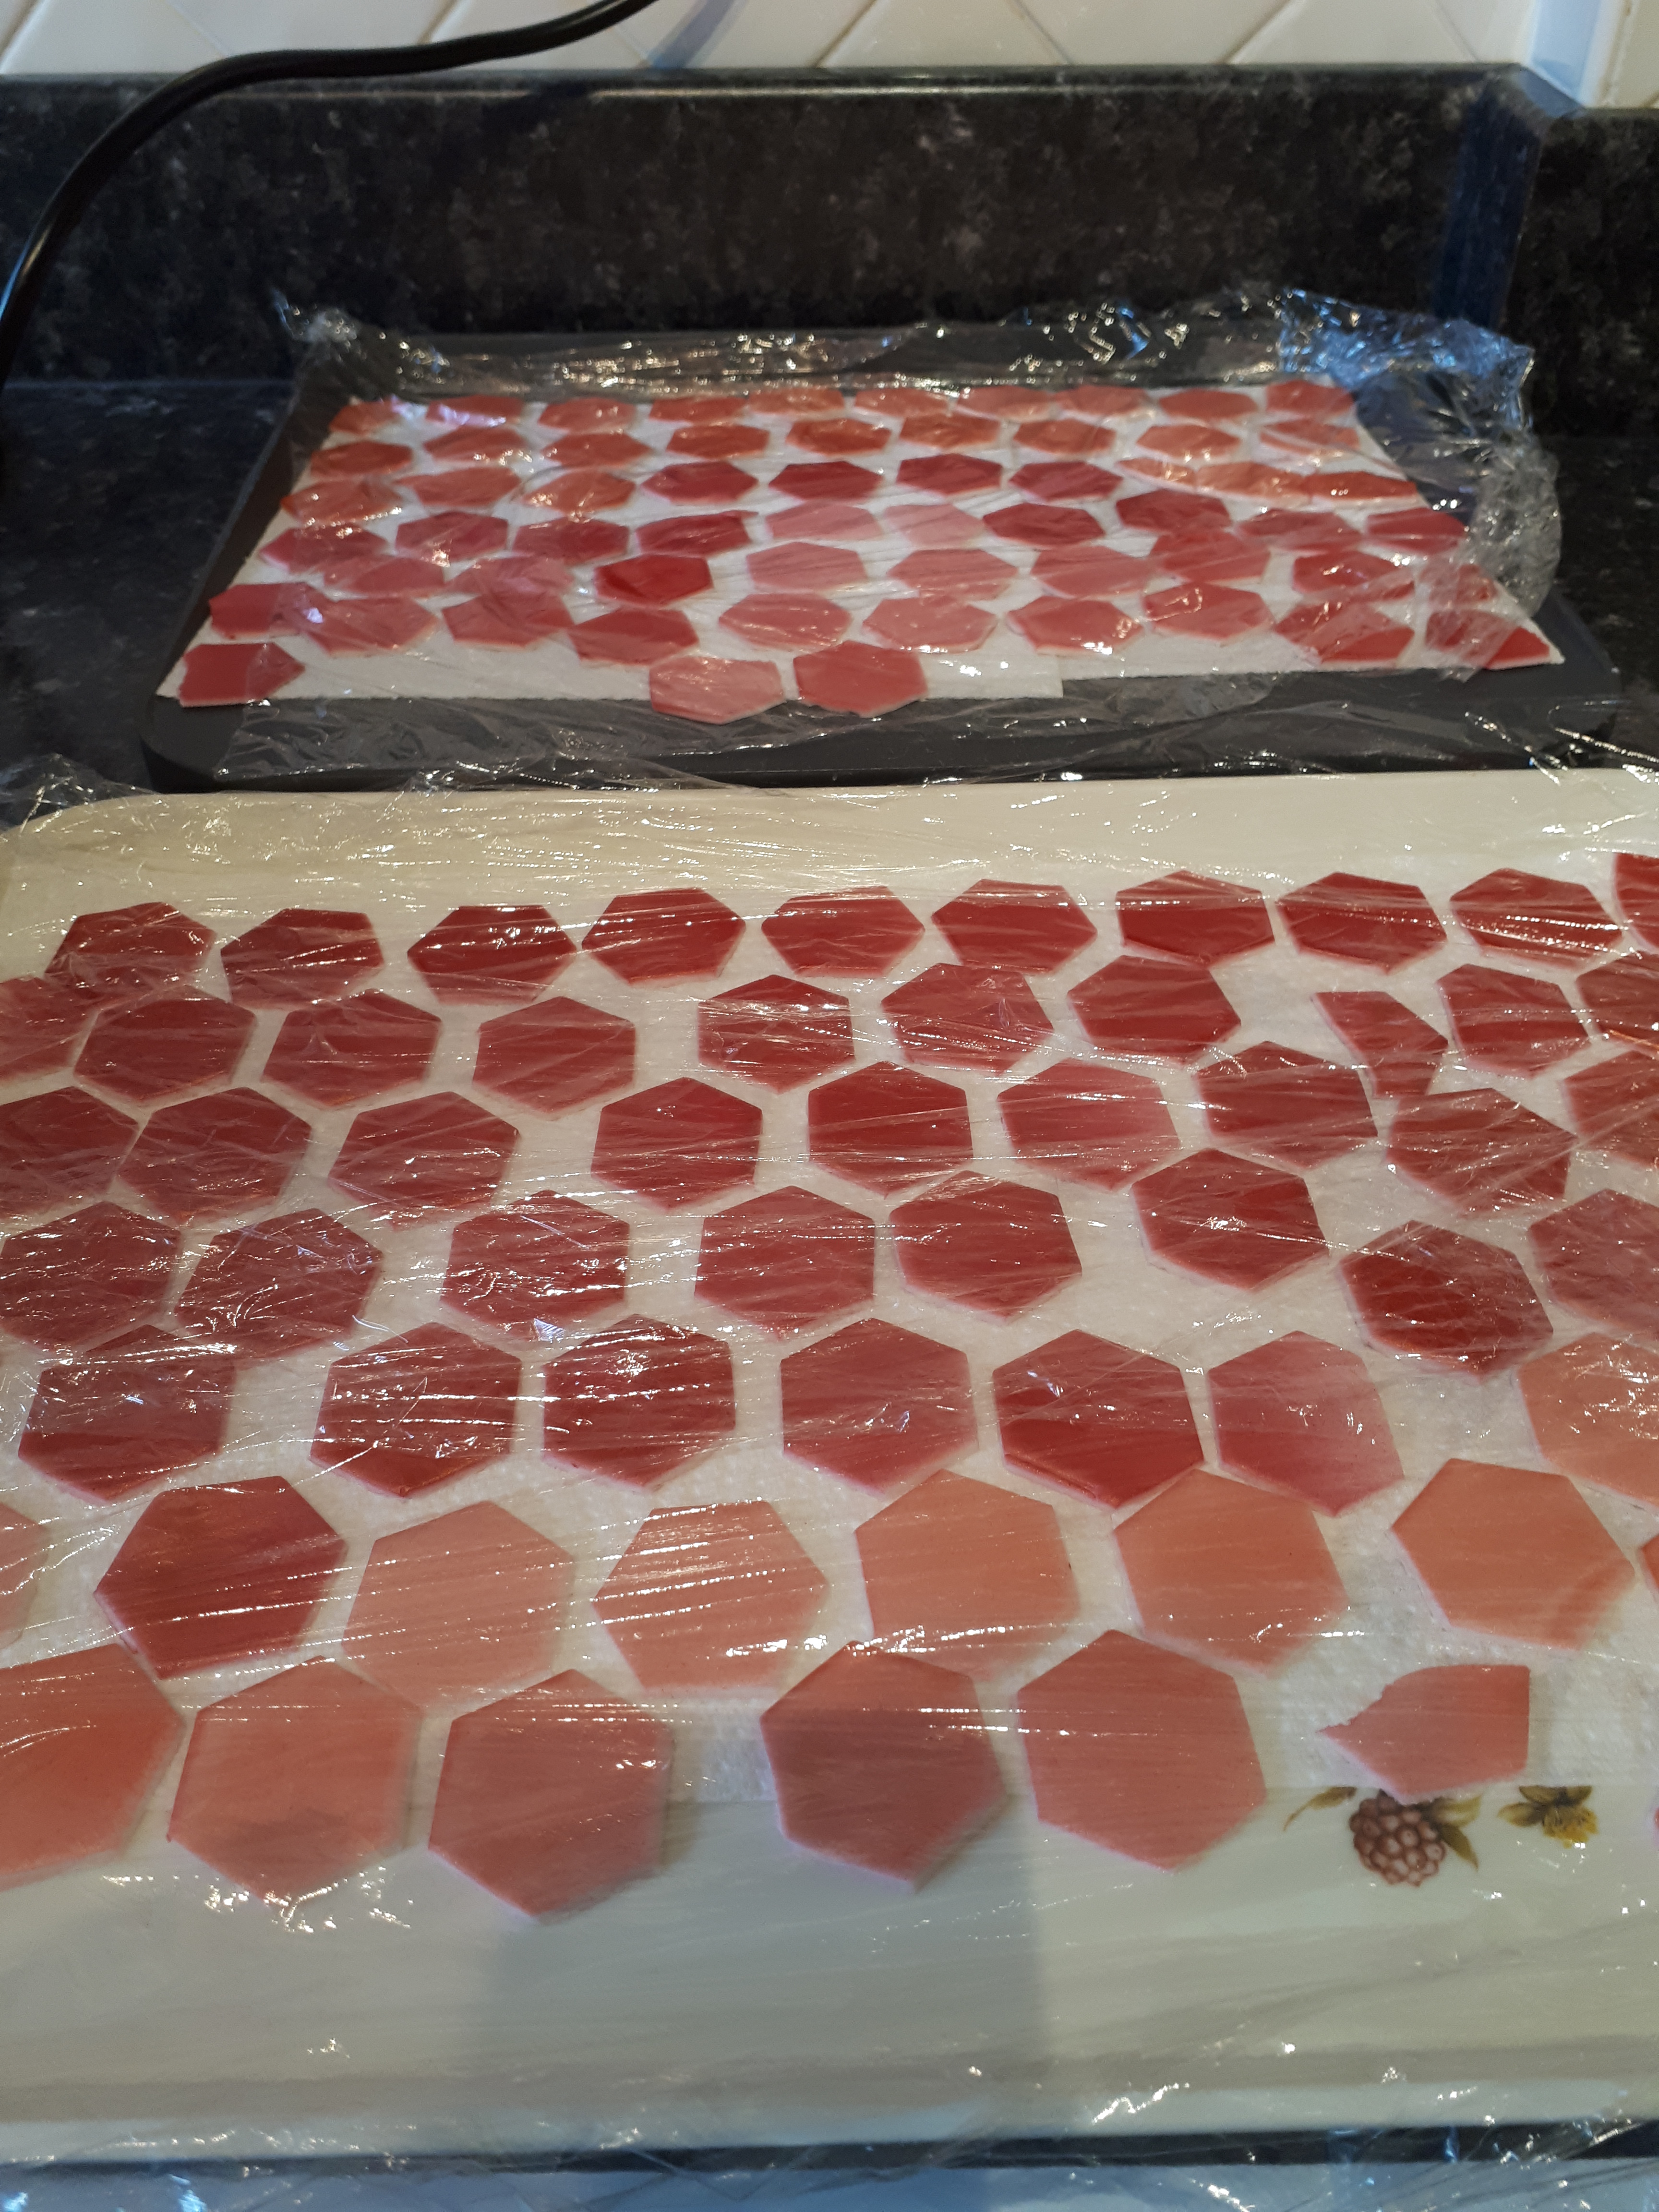
Then a large bit of imagination was required, as only the bottom two tiers were transported stacked. Gaps had to be left to allow for movement and assembly, so I had to visualise how the pattern would work once it was stacked together, and the plan was for there to be a bit of a colour gradient from bottom to top.

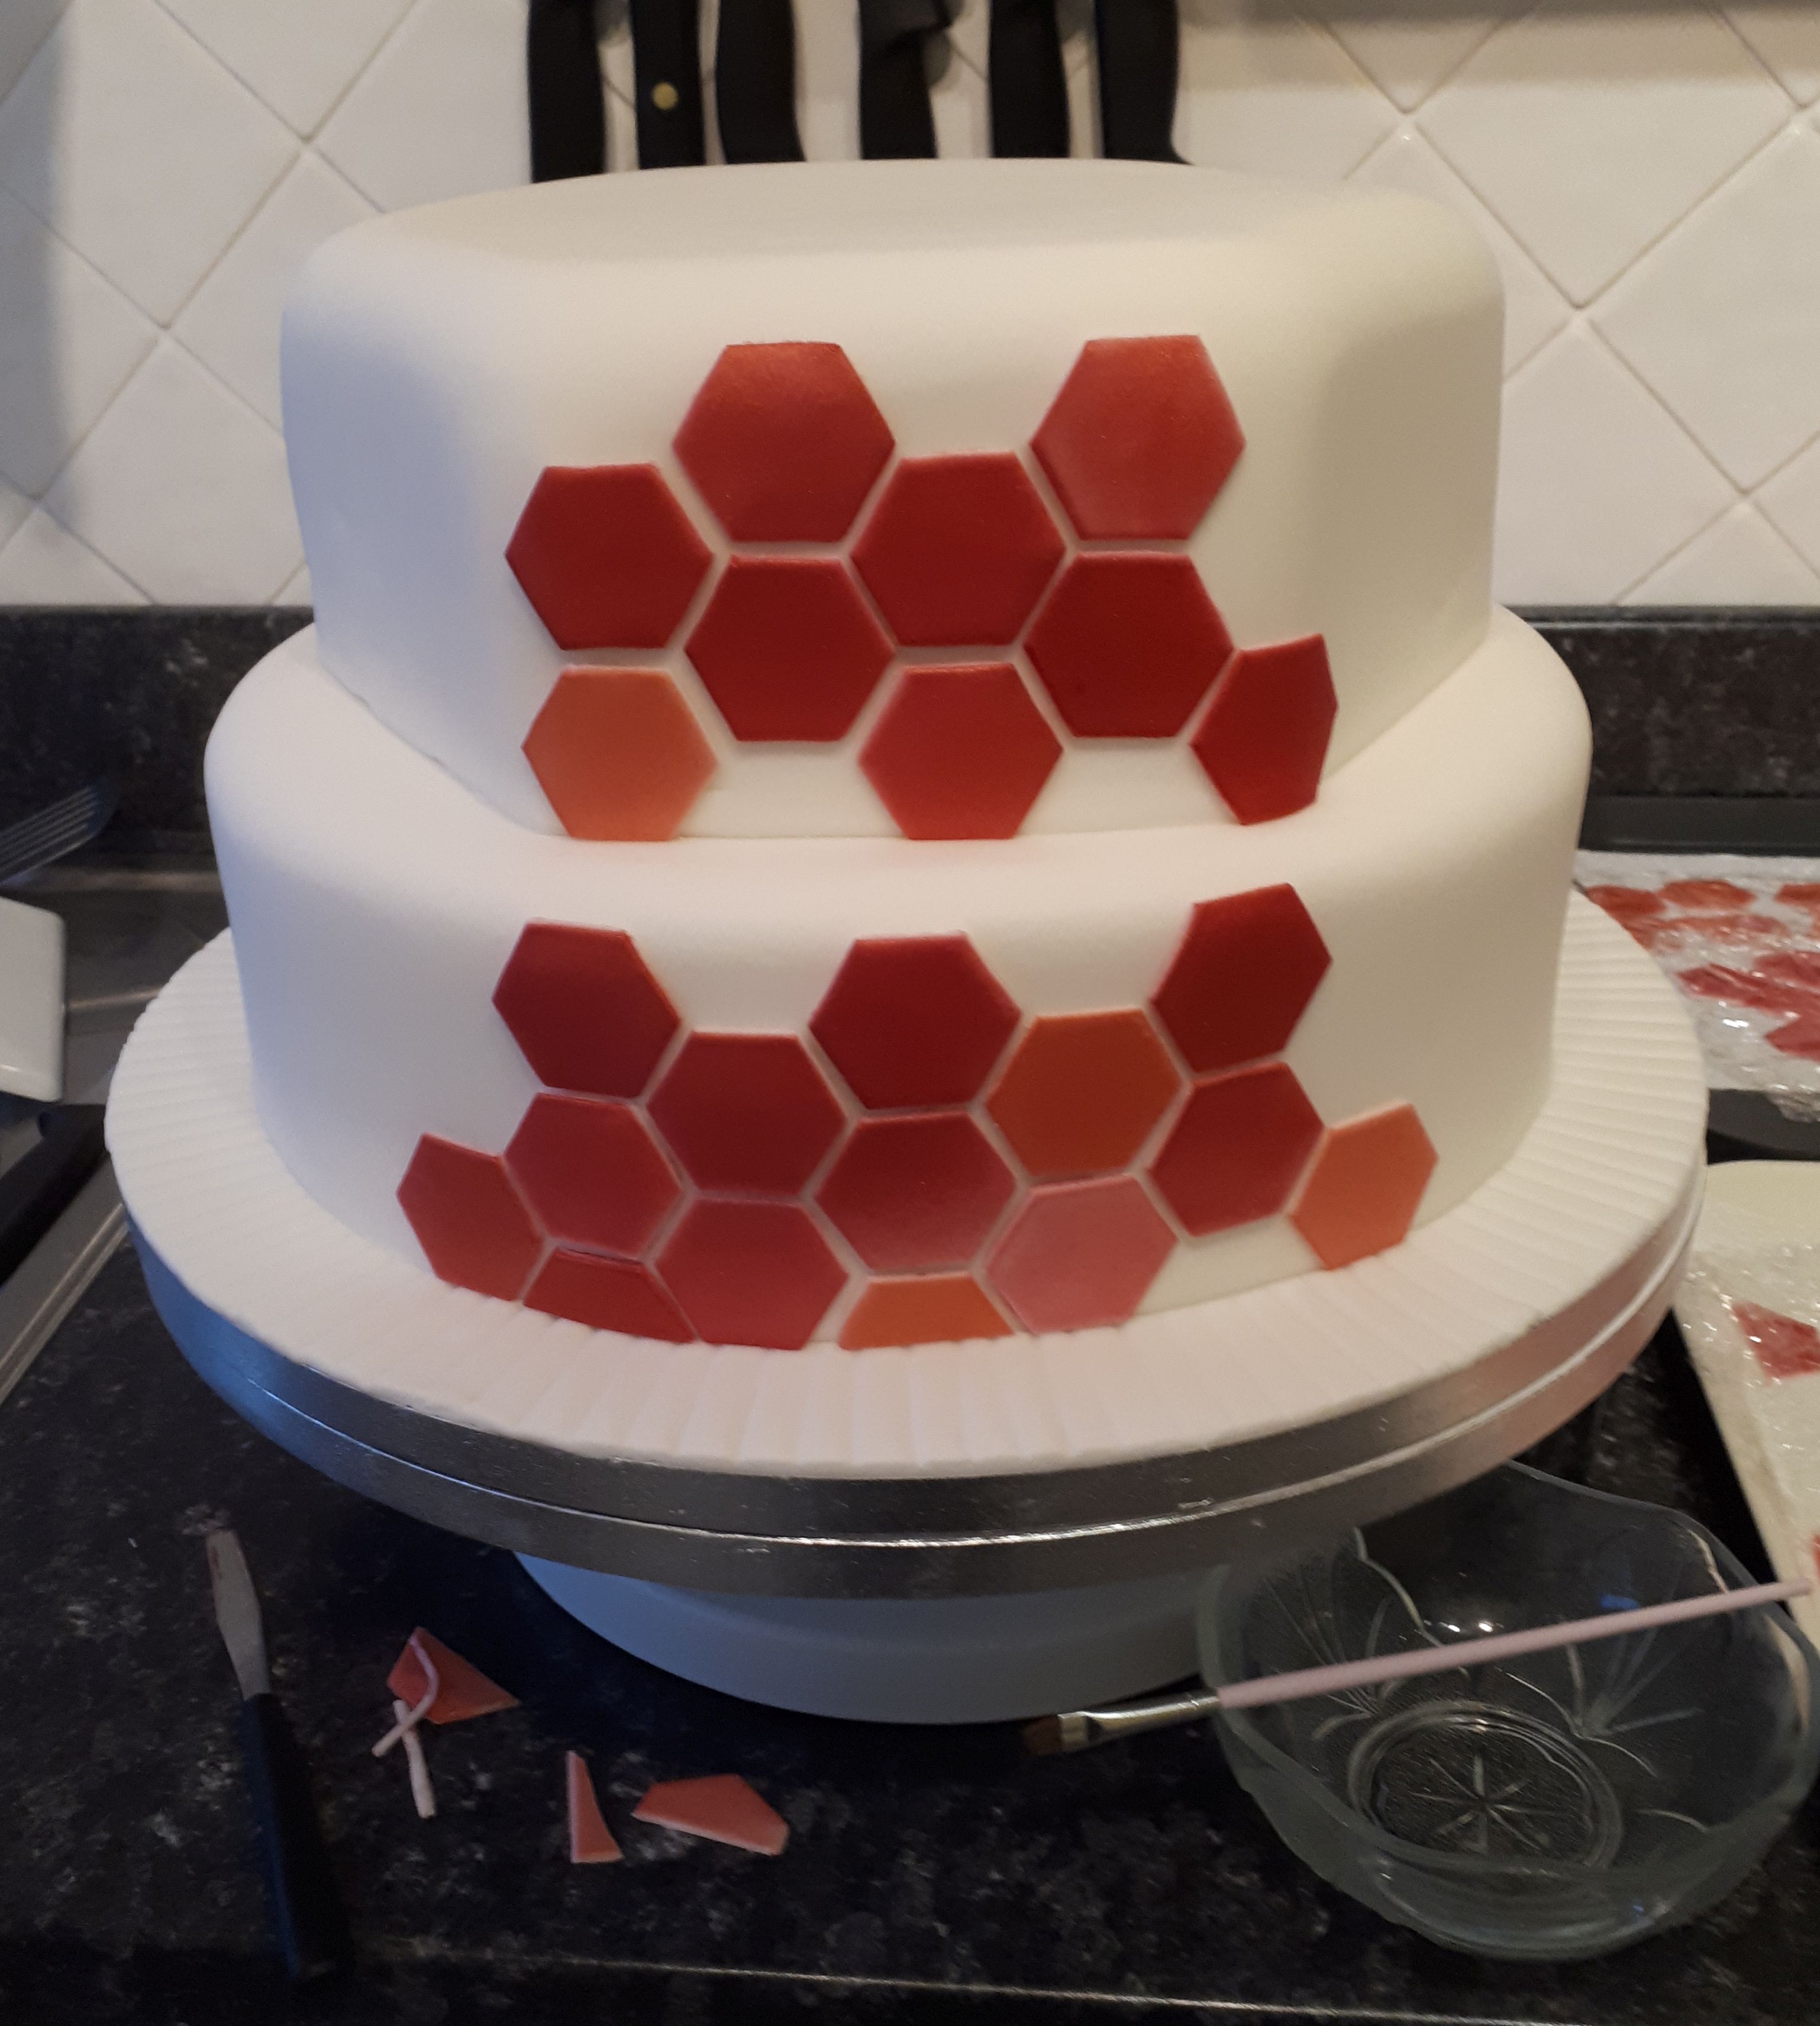
The board was decorated with my favourite technique (along with grass) – indenting lines with the end of a paint brush. It looks nice, is easy, and camouflages any joins in the sugar paste.

For any wedding cake, I always bring a cake kit – for any assembly but also emergency repairs! This time the kit included more hexagons – layered on baking paper for being non-stick, and kept in an air tight box so that they stayed soft. This worked really well, so the colours didn’t crack or shift either.

With the cake assembled the toppers were added. We knew we wanted the cake on display throughout the day not revealed 30 minutes before it gets cut – thankfully the lay out of the Mansion House lets this happen!

Photo from Ashley-liv Jamieson Photography

Another priority in planning the cake was that we both got to EAT the cake. So when the cake was cut, we were straight in to that queue! I’m pretty sure I had a bit of everything!

I really enjoyed the whole process of making our wedding cake. It helped that we had a lot of help, that there was not a lot of last minute details to sort out and that we had time off work to do it all. My advice for anyone else doing this is have a good plan, a design you are confident in, and be prepared that things might get downscaled if time runs out – I would absolutely recommend it!

A Mario and Zelda Themed Wedding Cake

There is no denying that this was a very exciting cake to be asked to do – a wedding cake themed around Mario and Zelda. And all in chocolate, with ganache, the best icing to work with. And for an extra step, a separate gluten free cake, to be as much a part of the wedding as the main cake. It is safe to say this took a lot of time, consisting of the research before hand (including playing the Wii U a lot), the time spent making the topper and decorations, as well as the time them spent making the actual cake – but the reactions made it completely worthwhile, as ever!

The topper was different to the usual bride and groom, in that they were in karts from Mario Kart. This also meant working on a smaller scale too. I have a work tray for doing modelling work, so set that up with the tools and pastes needed, and then got busy.

Here is a slightly disturbing shot of a headless bride and groom:

Headless couple

Followed by a much better looking completed couple:

Finished couple

And a ‘Just Married’ sign to go over them:

20150531_103940

It was a pretty wonderful day when it was finished, and looked as I had imagined!

20150531_192751

Here are some of the limited pictures of the making of the other bits that went on to the cake – apologies that some of them are from screen shots of Snapchats.

20150602_181357 1 272 3 20150601_192705

There were a few other pre made bits, which missed having their pictures taken, sunch as the Rainbow Road fences, and Moo Moo Meadows grass. Having them made in advance meant that putting it all together did not take too long.

That cake its self was all chocolate sponge,the different tiers filled with coffee, caramel and chocolate buttercream. In a trial run, i used a jar of caramel sauce (Tescos Finest) added to my usual buttercream, which was very tasty. However, then I could not find a new jar when I needed it, so used this recipe instead from John Whaite. This is up there as a contender for the tastiest thing I have ever made, so I suggest everyone goes forth and tries it too – especially if you missed out at the wedding.

Figuring out the road running up the side of the cake took some time, and then once it came time to make the cake, I did it completely differently too. Each cake had a rice crispy add-on to the side to make the road up to the next tier. All the cakes were covered in ganache, then sugarpasted. The bottom tier was also air brushed, where as the top two were covered with green sugarpaste.

8

4 5 6 910311

Here it is in location, at The Golden Lion hotel in Stirling.

 rob and aly wedding cake

A gluten free wedding cake was also part of the order, to be shaped as a Tetris brick. Again, this was covered in ganache (having been filled half with chocolate buttercream, and half with white chocolate buttercream) then sugarpaste.

20150524_203822


20150524_204746

It was airbrushed red, and the board covered with more sugarpaste Tetris bricks.

IMG_3021

Now I will bombard you with some more photos, in part because some of the details are easy to miss, especially the Zelda ones. I have no idea what an Ocarina is, but apparently it was important in the games (it’s the blue thing!).

12 13IMG_3032 IMG_3019 IMG_3016IMG_3023

It was great to make a cake that reflected the couples interests so well, and having completed the massive tidy up of the kitchen (the downside of working with chocolate), I find my self in a bit of a post wedding cake slump. However, this will be lifted very soon by the making of a birthday cake, of which I will hopefully remember to take more making of pictures.


A Yorkshire Wedding Cake

This weekend saw the completion of my third wedding cake. It had an excellent and unique theme – Yorkshire. The couple came to me with their ideas, and after a few sketches we confirmed which design to go with, along with the sizes and flavours wanted. In case anyone ever needs to know, rhubarb and vanilla jam can only be found in Waitrose, unlike rhubarb and ginger jam which can be found in every shop in Edinburgh (and an assortment of places off the A9 too).

The base tier (vanilla) was to be the Yorkshire country side, complete with rough fell sheep. The middle tier (chocolate) was to have a representation of the Yorkshire flag. The top tier was a Yorkshire pudding, complete with bride and groom figure.

I like a blog post with photos to show the making of pictures, but time tends to get away from me and having to wash my hands before I cover the camera in cake/ icing is a fiddle. So at Lewis’ suggestion, we set up the Gopro, which can be used to make time lapse videos. It worked really well – apart from the battery recharging while I actually covered the cakes. You can see the bottom and middle tiers being iced, then the decorations being applied.

The Yorkshire pudding doesn’t really feature in the video, but that was air bushed yellow, then with a mix of yellow and brown, a bit more brown on top. I then filled it with ‘gravy’ aka piping gel, which was surprisingly easy to make!

Here is a shot of the finished cake once it is all in place at their venue, Surgeons Hall in Edinburgh.

Yorkshire wedding cake

The groom did not quite make it to the very end of the night – I guess he could not resist a swim in the gravy! (it was taken on my phone)

Gravy groom

Fender Stratocaster Wedding Cake

I was excited to land my first non-family wedding cake in July. And a little bit more excited to find out it was for a novelty cake, which is after all, my specialty. The request was for a guitar – not just any guitar though, a Fender Stratocaster. I admit to knowing nothing about guitars, but my research (which included standing in a shop in Newington just staring at guitars) suggested that this is *the* guitar to have.

So I started off with making a huge cake, to cut to shape using a template. Then making a smaller cake to add on when that one just didn’t have the right proportions on its own. With a giant cake board purchased, I assembled and buttercreamed the cake.

Naked guitar

I did some serious airbrush practice before this – black on to white, on a wedding cake – it doesn’t get much more high pressure than that. Thankfully practice made perfect. Then it was a case of hand painting on the other colours, and fixing on the white plate.

Airbrushed cake

In a surprising fit of organisation I had premade all the silver bits earlier on, using grey sugarpaste. For the screws, I used silver lustre dust. For the tuning pegs, I used the Dr Otker spray. I really like both looks, but if you are ever using the spray, be warned that it does cover everything in the room (people included).

Silver bits

For the neck of the guitar, some serious maths was used to get the scale right. I used my extruder to make the frets, edible pen for the inlays and spaghetti for the guitar strings. There are a few different ways you can make the strings, but I wanted to stick with a 100% edible.  Then there was writing ‘Fender Stratocaster’ on the head as well. Again a bit of practice with writing on paper beforehand seemed to pay off. To finish it all off, I covered the board in yellow sugarpaste, before using gold lustre dust to turn it golden.

Finished guitar

Giant novelty cakes are no fun if the delivery isn’t a bit of a challenge as well. Thankfully I got parked right outside the venue, Cruz in Leith, as the finished cake weighed about a ton. Carrying the cake up a flight of stairs just proved that while cake decorators need the ability to do the fine detail work, they also need arms like Popeye to actually deliver the finished article!


Whistler Wedding Cake

I was super excited when my cousin announced she was getting married. I was even more excited when she asked me to make their wedding cake! After some discussion, she and her fiancé were have to give me free reign with the design as long as it represented Whistler, where they met. Now that sounds like a brilliant thing, but when you have complete freedom, you want to do everything you can think of! They had ordered customised cake toppers from Itty Bitty Wood Shoppe, which gave me a starting point for the look of the cake.

I decided to make the cake look like the mountain as well. Not quite a novelty cake shape, but topsy turvy so that it looked like mountains but in a more elegant way.  As an extra challenge, the cake was to be dairy free and low fat. My mum took over the baking and modified the recipes a bit so they would hold up to the carving and stacking needed.

I did some of the advanced decorating myself at home to test out ideas, and roped in dad to help with it too. Making sign posts was more a test of getting the colours right, and came together fairly quickly. Making the right kind of trees was a whole other story. I found this really handy website with 10 ways of making trees which was a great starting point. But even so, none of the trees looked right for the image I was working to.  I had recently purchased an extruder, which lets you make strings of sugarpaste. And so I hit on the idea of using this to make the trees. I might have under estimated exactly how long it would take to make trees this way, so my dad spent a fair bit of time helping to make a miniature forest.

The trees

The building of the cake happened at my mum’s house, so I lugged my supplies and ganache over to their house. I was impressed I managed just one trip from the car, mum was surprised by how quickly I took over the whole kitchen.

First up was carving all of the cakes. I judged it by eye especially as I wanted a bit of a rough result to keep the mountain theme going. The top tier had to stay flat for the toppers to go on.

A naked cake

Everything then got covered in ganache, made of either white chocolate or dark chocolate. Quite a bit of the kitchen got covered in ganache as well. It is a scary thing working with dark chocolate next to white chocolate, and next to white sugarpaste, but we managed without any mess.

Ganached cake

Sugarpasting the cakes was a bit of a challenge. Not only were they reasonably big – apart from the 6 inch cake, there was a 9 and a 12 inch cake – but the lip from carving them makes it trickier to cover.

The iced trio

With that done, the cakes needed stacked. Although similar to stacking a regular shaped cake, the topsy turvy needs to be stacked so the angles look good as well.

Stacked

The next stage was the decorating, the less technical and more creative part of doing the cake. The first part was to add the snow, made from royal icing. This also acted as the decoration to hide the joins.

Snow covered

Next up was adding the little Inukshuks and the trees. We had the toppers on so we could see how everything fitted together.

The basics

Details like the leaves, snowboard and signs were going to be added at the venue, as they were a bit more fragile. I travelled with my ‘assistants’ before the wedding, equipped with a wee emergency kit just in case of any disasters. Thankfully though, there were no problems. I had ordered an extra strong, large box from Catherine Scott to transport the cake in, much better than the normal thin cake boxes you get.

Boxed up

With the cake set up at The Vu, all that was left was for the bride and groom to see the cake – thankfully they loved it too!

The wedding cake